Problem: How to Export your Outlook Data file (.pst) from one computer to another Short link to the blog: http://blog.coretech.dk/?p=8923 First I want you to notice that I am using Outlook 2013. There are other versions of outlook and it is possible to do the exact same thing. You are able to transfer the data files […]
↧
Move An Outlook Data file To A New Computer / (.pst) / Emails
↧
Windows Phone 8.1 devices keep prompting for sign in to the Company Portal
I have been working on another mobility project the last couple of months. this project started as a hybrid SCCM/Intune project using “old” SCC 2012 R2 platform, a couple of weeks ago we migrated the platform to the latest service pack in order to get all of the new hybrid mobile features in place. The […]
↧
↧
ConfigurePXE blocks contentdistribution after SCCM 2012 R2 SP1 upgrade
Just finished another SCCM 2012 R2 SP1 upgrade, this time with a very “interesting” outcome. The site was a single primary site with close to 100 distribution points. The upgrade process went somehow smooth, primary site server was upgraded without any issues, except the management points had to restart before the SMS bootstrap service would […]
↧
Deploying WIFI profiles with pre-shared secret to Android devices using ConfigMgr
Today I have spend some time creating and deploying WIFI profiles to Android devices and would like to share my experiences. To get started with Android and WiFi profiles I used this TechNet article https://technet.microsoft.com/en-us/library/dn705842.aspx is almost correct, but there a few bugs in the XML example (as I see it, authentication and encryption).
To get me all the way I combined the knowledge from the article with information from MSDN https://technet.microsoft.com/en-us/library/dn705842.aspx and finally this super nice Android PSK Generator community tool – http://johnathonb.com/2015/05/intune-android-pre-shared-key-generator/
The Android XML configuration is really easy,just add the WiFI information into the Configurator and click Create file.

Create the Android WiFi profile in ConfigMgr.
- In the ConfigMgr Console, in the Assets and Compliance workspace, navigate to Compliance Settings, Configuration Items.
- From the ribbon, click Create Configuration Item. On the General page, configure these settings and click Next.
- In Name type: MyWIFI
- Specify the type of configuration item: Mobile device
- On the Mobile Device Settings page, enable Configure additional settings that are not in the default settings group and click Next.
- On the Additional Settings page, click Add and click Create Setting.
- Configure the Create Setting dialog with these settings and click OK
- Name: MyWiFi
- Setting Type: OMA URI
- Data Type: String
- OME-URI: ./Vendor/MSFT/WiFi/Profile/MyWiFi/Settings

- Back in the Browse Settings dialog, select MyWifi (your newly created setting) from the list and click Configure Setting.
- In the Create Rule dialog, paste the XML code from the Android PSK Generator tool and click OK.

- Click Close, and Next. On the Supported Platforms page, uncheck all platforms except Android and Click.
- Finish the wizard and you CI is ready to be deployed.


Deploy the Android Wifi profile
Configuration Items has to be added to a configuration baseline in order to be deployed.
- Still In the ConfigMgr Console, navigate to Compliance Settings, Configuration Baselines.
- From the ribbon, click Create Baseline Item.
- In Name type: MyWiFi click Add, Configuration Items and select your MyWiFi configuration item.
- Click Add and OK twice to finish the baseline.
- Select the baseline and click Deploy on the ribbon.
- Make sure you enable Remediate noncompliance rules when supported, select a USER collection and click OK.
Your Android devices will automatically receive the new network configuration next time they receive a policy update.

↧
Troubleshooting with Remote Desktop Connection – Solving the issues
Problems like:
Cannot connect to the machine
Not able to sign in on the machine / user / server
Security is blocking my connection
Quote: “To sign in remotely, you need the right to sign in through Remote Desktop Services. By default members of the Administrators group have this right. If the group you’re in does not have the right, or if the right has been removed from the Administrators group, you need to be granted the right manually.”
I will now help you with some troubleshooting. Basically there’s no fast way of doing it, but every time you’ve done something new, try to sign in with remote desktop to see what was causing it.
Step 1: Firewall!
If it’s a security problem, you might as well check your firewall settings. I want you to open your firewall settings. To do this go to “windows” and search for “Windows Firewall”.
We want to disable it or allow an application to go through the firewall. Sometimes it will happen that you need to disable it completely, so I will show you how to do that.
Click on “Turn Windows Firewall on or off”, pick the settings below and click “ok“. (A picture below shows you my example)

Now when that is done, it becomes a little tricky. To get an allowance to get remotely access into another computer, requires the right policies.
I will now show you a list of things you could try to fix this problem.
Go to “start -> Control Panel -> User Accounts -> Give other users access to this computer -> Add..
Now put in your User name and if it’s a part of a domain, write that too. (It could just be your computer name if it’s local).
You can also use the browse feature to find your user. When it’s done you should be able to see your User Name | Domain | Group .
Now click on your user and you should be able to select properties, on the top click on “Group Membership”.
You can now select a role for your user, you might see the options:
- Standard User
- Administrator
- Other: (Remote Desktop Users)
When this is done, try to use your RDP and see if you can connect (If this doesn’t work proceed to the next step below)
Step 2: Allow remote connections to this computer
Right click on windows, click on system and then go to Remote settings.
Click on “Allow remote connections to this computer”, then click on select user and and a new pop-up should be there.
Click “Add..” and then enter the user or account you want to find, then click ok and you should be able to see it in the box.
It should look like this, if you added it correctly:

Once this is done, try to connect to it through remote desktop (If this doesn’t work proceed to the next step below).
Step 3: Allow log on through Remote Desktop Services
In this step we are going to take a look into the Local Security Policy.
Open windows and search for “Local Security Policy”. Once it’s open, go to “local policies” and then “User Rights Assignment”.
Find “Allow log on through Remote Desktop Services“, right click and go to Properties – add your account or group just like the previous steps.
Now it should look like this:

When this is completed, go below this and search for “Deny log on through Remote Desktop Services” and see if you are in there for some reason.
If so, remove your user or group from this one and click “ok”.
If this step didn’t help either (Proceed to the next step below).
Step 4: Using Registry Editor to allow Remote Desktop Connections
Search in windows for regedit and open it, when the editor is up follow these simple steps:
HKEY_LOCAL_MACHINE -> SYSTEM -> CurrentControlSet -> Control -> Terminal Server
Make sure to click on Terminal server. When you have clicked, you should be able to find “fDenyTSConnections“.
Right click and modify, then go to value data and change the value to “0″ instead of “1″.
Click “ok” and sign in and out.
If any of these steps helped you or didn’t help you, please don’t hesitate to give me feedback or leave a comment before you leave.
I hope this solved some of your problems. Remember if you’re connected to a domain – you have to add your users through “Group Policy“.
Best regards
Alexander Gundelack Jensen
↧
↧
Missing tabs on Boot image after installing ADK for Windows 10 in ConfigMgr
If you install the ADK for Windows 10 after you upgrade to ConfigMgr 2012 R2 SP1, existing boot images won’t be upgraded and as a result you will be missing a few tabs on the properties of the boot image, such as adding Drivers and Customize.
![2015-08-17 13_30_20-Coretech - ctcm01.coretech.intra - [SCCM 2012 server] - Royal TS](http://blog.coretech.dk/wp-content/uploads/2015-08-17-13_30_20-Coretech-ctcm01.coretech.intra-SCCM-2012-server-Royal-TS_thumb.png "2015-08-17 13_30_20-Coretech - ctcm01.coretech.intra - [SCCM 2012 server] - Royal TS")
This happens because SCCM compares the version of the installed ADK to the version of the boot image, and if these do not match the tabs to modify the boot image will be hidden. When we update the distribution points the version is not checked and image just rebuild and redistributed.
the fix
Well, if you haven’t installed the SP1 yet, you can simply make sure to uninstall the old ADK and install the new one before installing SP1. The installer will update the boot image for you.
If you have already installed SP1 luckily there is a fix:
First you need to update the boot.wim file that SCCM uses for the default boot images.
Copy the winpe.wim file from the installation folder of the ADK such as: (make sure the architecture is the same, in this case 64-bit)
C:\Program Files (x86)\Windows Kits\10\Assessment and Deployment Kit\Windows Preinstallation Environment\amd64\en-us”
Copy the file to your OSD folder in the installation directory of your ConfigMgr such as:
“D:\Program Files\Microsoft Configuration Manager\OSD\boot\x64”
Delete the old boot.wim and rename the winpe.wim to boot.wim
Do the same for the 32-bit image.
If you have custom boot images, replace the source media in these as well.
Now we need to refresh the image data that ConfigMgr uses to decide whether or not to show the extra tabs on the options dialog.
Create a new PowerShell script with the following content:
1 $SiteCode = "PS1"
2 $PackageID = "PS100005"
3 $BootImage = Get-WmiObject -Namespace "root\SMS\site_$($SiteCode)" -Class SMS_BootImagePackage -Filter "PackageID = '$($PackageID)'" -ErrorAction Stop
4 $BootImage.ReloadImageProperties()
Make sure to specify the correct site code and package ID for the Boot Image to update.
Now run the script with administrative privileges.
Voilà your boot image is now updated to Windows 10 ADK, and you can add drivers and customize to you image again.
![2015-08-17 13_55_58-Coretech - ctcm01.coretech.intra - [SCCM 2012 server] - Royal TS](http://blog.coretech.dk/wp-content/uploads/2015-08-17-13_55_58-Coretech-ctcm01.coretech.intra-SCCM-2012-server-Royal-TS_thumb.png "2015-08-17 13_55_58-Coretech - ctcm01.coretech.intra - [SCCM 2012 server] - Royal TS")
Remember to update your distribution points to build the image and redeploy content.
↧
Links from the ConfigMgr Visualization session @ SCU in Basel
Standard ConfigMgr reporting
- -Introducing to reporting in Configuration Manager – https://technet.microsoft.com/en-us/library/gg682105.aspx
- -Channel 9 – http://channel9.msdn.com/Events/MMS/2013/UD-B338
Custom reports
- Add custom code and color scales like Excel – http://blogs.msdn.com/b/bobmeyers/archive/2009/07/31/add-excel-like-color-scale-conditional-formatting-to-your-reports.aspx
Power Views and Power Queries
- Download Power Queries for Excel – http://www.microsoft.com/en-us/download/details.aspx?id=39379
- Getting started with Power Queries – http://www.databasejournal.com/sqletc/getting-started-with-microsoft-power-query-for-excel.html – https://support.office.com/en-us/article/Microsoft-Power-Query-for-Excel-Help-2B433A85-DDFB-420B-9CDA-FE0E60B82A94
- Download Power View – http://www.microsoft.com/en-us/download/details.aspx?id=26718
- Getting started with Power View – https://technet.microsoft.com/en-us/library/hh213579(v=sql.110).aspx – http://blogs.msdn.com/b/seanboon/archive/2012/07/30/visualizing-the-olympics-with-power-view-in-excel-2013-day-1.aspx
Custom community dashboard
- Compliance -http://blogs.technet.com/b/gary_simmons_mcs/archive/2014/09/16/system-center-2012-r2-configuration-manager-software-update-compliance-dashboard-part-1.aspx
- Patch Management – http://blogs.technet.com/b/gary_simmons_mcs/archive/2013/12/09/creating-a-custom-report-for-system-center-2012-r2-configuration-manager-part-1.aspx
- Client Health – https://gallery.technet.microsoft.com/SCCM-Configmgr-2012-SSRS-2863c240
- A little of everything – http://blogs.technet.com/b/configmgrdude/archive/2015/01/06/creating-a-simply-dashboard-using-smsprov-log-in-configmgr-2012.aspx
Professional dashboards
- Configuration Manager – http://www.coretech.dk
- Operations Manager – https://squaredup.com/ – https://www.savision.com/
↧
Managing Windows 10 using On-premises MDM in System Center Configuration Manager vNext
There is a new management agent in town…. the built-in Windows 10 management agent. With that agent you are able to deploy applications (with some limitations in TP3), gather inventory data and deploy configuration items. in this post I will describe how to you can create configuration items to control various settings. If you want to play around with the complete list of Windows Defender settings you can download the full list of CI’s here (I didn’t have time to test all of them……just saying).
The MDM requirements are a little tricky in the sense that you need the following site systems running in “PKI mode”:
- Device Management Point
- Device Distribution Point
- Enrollment Point
- Enrollment Proxy Point
Besides the site system roles you also need to create a Microsoft Intune subscription (user sync to azure ad is not required). When configuring the subscription you’ll notice that the same connector now support both Cloud and On-premises MDM management. There will be a separate blog later explaining how to configure and install the on-premises MDM infrastructure. For now I’ll focus on testing a few features.

The enrollment process is straight forward, on the Windows 10 client open Settings, Accounts and configure the Work account. When enrolling the device you need to use one of the users defined in the collection you defined in the Intune connector.

When clicking on the user information you’ll be able to see a few additional information and also initiate a synchronization. The synchronization seems to be controlled by the client agent refresh machine policy settings in the client agent settings.

The Windows 10 Settings can be controlled thru the MDM agent using Configuration Items in Configuration Manager. In this example I have created a bunch of Windows Defender settings that control, how often the client will scan, when, what the end user can modify etc.

The result on the client looks like this in Settings, Defender. Notice that the client can see the current values but not change any of them. If you want to completely hide Defender from the user just use the configuration item Defender AllowUserUIaccess and configure the value to 0.


Creating the CI requires that you know a little about OMA-DM. There are several good blog posts explaining what that is all about. A good reference guide to what you can configure is this one https://msdn.microsoft.com/en-us/library/windows/hardware/dn904962(v=vs.85).aspx From the list of CSP’s select the Policy CSP and get started. The rules are simple, you follow the diagram below. The only thing you have to specify is the AreaName eg. Defender (to work with Windows Defender) and the Policy name eg. AllowUserUIaccess. In this example I’m configuring the Windows Update agent on the client ./Vendor/MSFT/Policy/Config/Update/AllowAutoUpdate – here “update” is the AreaName and AllowAutoUpdate is the policyname.
.png")
To configure the policy in Configuration Manager, open the Configuration Items in the Assets and Compliance workspace. In this example I’m configuring automatic update to download, install and automatically restart the computers 03:00 AM (the restart time is the default value and can be changed)
- Click Create Configuration Item, assign a name (remember a solid naming standard or you will regret it after a few weeks, using the AreaName and PolicyName works for me). Select Windows 8.1 and Windows 10, Settings for devices managed without the Configuration Manager client and click Next.

- On the Supported platform page, deselect Windows 8.1, Windows 8.0 and click Next.
- On the Mobile Device Settings page, click Configure additional settings that are not in the default settings group and click Next.

- On the Additional Settings page, click Add and Create Setting to start creating the custom CI. In Setting Type, select OMA URI, data type is Integer and the OMA-URI string is ./Vendor/MSFT/Policy/Config/Update/AllowAutoUpdate. Click OK when done.

- From the list of configuration items, select the newly created item and click Select

- In value type 3 and click OK.

- Finish the wizard and deploy the Configuration Item as a baseline.

- In the deployment ensure that you configure Remediate noncompliant rules when supported


On the Windows 10 devices, the Advanced Update settings will automatically be changed after the next policy synchronization.
Inventory
Unlike Intune enrollment this client will end up in the Configuration Manager console. Hardware inventory data is not as rich as the “real” Configuration Manager client – but you still get the most important stuff the OS version etc.

That’s it – happy testing and I’m sure you like me will find many scenarios where the Windows 10 MDM agent will be just perfect to meet the management needs.
↧
Install and Configure on-prem mobile device management (MDM) with ConfigMgr vNext TP3
This guide is written by Panu Saukko and Kent Agerlund (both Microsoft Enterprise Client MVP’s). These are the steps we used in our demo environments to configure the new on-prem MDM feature in system Center Configuration Manager vNext Technical Preview 3. In the article you will notice that we used two different environments and you will see screenshots from both environments. Don’t let that confuse you, happy reading and enrolling.
The environments we used are:
Configuration Manager site: vn3, Site Server: vnext.corp.viamonstra.com, Domain: corp.viamonstra.com, PKI server: dc.corp.viamonstra.com
Configuration Manager site: C15, Domain: cmdemo.local, PKI server: cm-dc1.cmdemo.local
System Center 2012 Configuration Manager has an option to manage mobile devices using Microsoft Intune. The feature requires that mobile devices must have an internet access which is sometimes not an option for the organization.
In ConfigMgr vNext we now have an option to manage mobile devices using on-prem environment. The feature is not fully ready and have some limitations like:
- Currently only Windows 10 devices are supported
- This still requires Microsoft Intune subscription, which is needed for accounting purposes. The mobile devices don’t contact Intune services, so they don’t need to have an internet connection (well almost not, please see the troubleshooting section for more information).
The infrastructure requirements
The infrastructure requirements can be quite tricky due to the fact that you need at least one HTTPS based management point, distribution point and enrollment point. If your environment has an internal Certificate Authority (CA) hierarchy, then you can utilize that and just go ahead with creating the certificates. The challenge for many is if you don’t have CAs. In that case you need to install and configure at least one CA server. The PKI requirements are described in the TechNet documentation https://technet.microsoft.com/en-us/library/gg699362.aspx.
For Configuring a POC environment, you can also do the cool thing and let PowerShell configure your PKI server. This example will install and configure PKI:
Add-WindowsFeature Adcs-Cert-Authority -IncludeManagementTools
Add-WindowsFeature Adcs-Enroll-Web-Svc -IncludeAllSubFeature -IncludeManagementTools
Add-WindowsFeature ADCS-Web-Enrollment -IncludeAllSubFeature -IncludeManagementTools
Install-AdcsCertificationAuthority -CAType EnterpriseRootCA -CryptoProviderName "RSA#Microsoft Software Key Storage Provider" -ValidityPeriod Years -ValidityPeriodUnits 5 -KeyLength 2048 -HashAlgorithmName SHA1 -Force
Install-AdcsWebEnrollment –Force
After that next step is to configure and deploy the certificates. Step-by-Step Example Deployment of the PKI Certificates for Configuration Manager: Windows Server 2008 Certification Authority: https://technet.microsoft.com/en-us/library/gg682023.aspx in our demo environment we configured 1 web server certificate and 1 Client certificate.

The ConfigMgr Web Server certificate, where we included both Server Authentication and Client Authentication. The certificate is based on the web server template. On the Request handling tab configure the Allow private key to be exported and ensure the site system servers can read and enroll the certificate.

One very important step that is missing from the TechNet documentation is the configuration of the Certificate Revocation Lists (CRLs). You must configure Certificate Revocation Lists (CRLs) otherwise the Windows 10 device enrollment process will fail. The Windows 10 MDM client will automatically do CRL checking, a “feature” which you cannot disable. Here is a link to the good article how to configure CRLs to a local server:
- These are the steps we followed to configure CRL:
- Create the directory c:\inetpub\wwwroot\certenroll
- Launch the Certification Authority, right click the properties and select the Extensions tab.
- Click Add and configure the URL to the CRL folder, in our example it is c:\inetpub\wwwroot\certenroll\<CaName><CRLNameSuffix><DeltaCRLAllowed>.crl. In Variable select <DeltaCRLAllowed> and click OK.

- Make sure you enable Publish CRLs to this location and Publish Delta CRLs to this location and click OK.
- Right click Revoked certificates, All Tasks and click Publish.

- Select New URL and click OK.

- These are the publishing parameters we used:


After publishing the certificates, you need to verify that certificate(s) used by the management point and distribution point is configured to use the CRL. After you have enrolled the certificate, open the certificate properties, click Details and check the CRL Distribution Points.

From the CRL Distribution Points properties, copy the URL (in this example http://DC01.corp.viamonstra.com/CertEnroll/corp-DC01-CA-1.crl) and paste it into to your favorite web browser. Also, check that you can access the delta CRL which is typically the same file name appended with “+” character (http://DC01.corp.viamonstra.com/CertEnroll/corp-DC01-CA-1+.crl). Remember that you need to enable allowDoubleEscaping setting to allow IIS to support URLs with “+” characters.
Configuration Manager Configurations
On ConfigMgr side, you must enable User Discovery. Create a user collection which contains the users who are allowed to enroll mobile devices:
Then restart the SMS_Certificate_Manager thread of the SMS_Executive service.
If your site server is running on Windows Server 2012 R2, create and set the following registry key value as a DWORD, on the site server:
HKLM/system/currentcontrolset/control/securityproviders/schannel/SendTrustedIssuerList=1
On ConfigMgr configure the following site servers:
- Cloud connection point: to provide connection to Microsoft Intune
- HTTPS enabled MP, enable: Allow mobile devices and Mac computers to use this management setting

- HTTPS enabled DP with the following setting enabled: Allow mobile devices to connect to this distribution point

- Enrollment Point with standard settings
- Enrollment Proxy Point with standard settings


When you add Microsoft Intune subscription to ConfigMgr you can select: Only manage devices on premises if you don’t select it, the same Intune tenant can manage both on-prem and cloud based mobile devices. On-prem MDM management doesn’t require any special configuration to Microsoft Intune. For example, you don’t need to configure Azure Active Directory like you normally need when managing devices over the Internet.

When adding Microsoft Intune connection, define a collection of users who are allowed to enroll devices.
Remember to select Configure Platforms / Windows / Enable Windows enrollment to allow enrollment of Windows devices.
Prepare the Windows 10 devices
Windows 10 devices that will be enrolled to on-prem MDM need to trust the CA’s root certificate. You have a couple of options to do that.
First you need to export the CA’s certificate to .cer file. Then you can import the certificate to ConfigMgr. In the ConfigMgr console, go to Assets and Compliance / Compliance Settings / Company Resource Access / Certificate Profiles. Click Create Certificate Profile and name to the profile, make sure that Trusted CA certificate is selected.

On the Trusted CA Certificate page, click Import and browse to the root cer file, and select Computer certificate store – Root as the destination store.

The last step is to enable Windows 10 as a supported platform.
Next step is to create the Modern device enrollment profile in the client settings. From the administration workspace, open the Default Client Setting properties.

The creation of the profile is easy. Just give a name, select the management point site code, and you should see the certificate profile that you created earlier.

In Technical Preview 3, there seems to be a bug that the root certificate defined in Modern device enrollment profile is not correctly installed to the client. Thus, you need to manually add CA’s certificate to the client’s Trusted Root Certification Store or you can create an enrollment profile.


The enrollment is quite easy on Windows 10. First you need to go to Settings / Accounts / Work access and select Connect.

Then you provide your account’s UPN. First it will fail, because you need to enter your Enrollment Proxy Point’s FQDN:

Then you just enter the password and if everything is fine, you should see the following message:

As you can see, there are quite a few steps to make on-prem MDM to work!
Troubleshooting tips
If the enrollment doesn’t work, check the following things:
- Is the name resolution working? Can you resolve your server’s FQDN from Windows 10 client?
- You get a nice error message, if Windows 10 client doesn’t trust the MPs certificate. Then you need to import your CAs certificate to your client’s Trust Root Certificate store.


If you can enroll Windows 10 machine successfully, but it cannot sync correctly with the error 0x800728f, check your CRL settings.

Most probably, you cannot either access the CRL or delta CRL file from Windows 10 client.
Here are some useful log files on management point that you should check if you have problems:
EnrollmentService.log (\sms_ccm\EnrollmentPoint\Log)
If you don’t have Intune connection correctly, you might see the following error:
Error reading tenant ID from database. No account ID. Probably Intune subscription haven’t finished setup
SMS_DM (\sms_ccm\logs)
Gives you information about mobile device management point.
For this release, Internet access is required for the client policy synchronization to work. Without Internet connection you can enroll the device but synchronization fails.
About the Authors:
Panu Saukko, Enterprise Client Management MVP and MCT, is a senior consultant and trainer ProTrainIT with more than 20 years of experience working with Microsoft technologies. He has been MVP since 2003.
Twitter: @panusaukko
Kent Agerlund, Enterprise Client Management MVP, is chief enterprise client management architect @ Coretech Global and trainer with more than 20 years of experience working with Microsoft technologies.
Twitter: @Agerlund
↧
↧
PowerShell Script That Creates A Folder And A Shortcut On Your Desktop
Basic example of a script that creates a folder in your Local Disk "C" and then makes a shortcut on desktop so you have easy access to the folder.
First of all, open your powershell as administrator and make sure you are at a place where you are able to create folders such as the C:\ drive.
PS C:\WINDOWS\system32> cd ..
PS C:\WINDOWS> cd ..
PS C:\>
And now you are able to run the script!
- Copy and paste what is written below
$path = "C:\"
New-Item .\EpicFolder -ItemType Directory -Force

$wshshell = New-Object -ComObject WScript.Shell
$desktop = [System.Environment]::GetFolderPath('Desktop')
  $lnk = $wshshell.CreateShortcut($desktop+"\ShortcutName.lnk")
  $lnk.TargetPath = "c:\EpicFolder"
  $lnk.Save()

Write-Host "Folders and Shortcut created!"
Now that we have tried to create one folder, why not try to create 2 folders within the folder we just created?
Below you see a slightly different script that creates 1 folder and in that folder, you create 2 folders.
(If you already know that you are going to write a lot and likes to keep an order – this might become helpful)
$path="C:\"
New-Item .\EpicFolder -ItemType Directory -Force


$path = "C:\"
New-Item .\EpicFolder\Plugins -ItemType Directory -Force
New-Item .\EpicFolder\Plugins\TestPluginDocument.doc -ItemType File

$path="C:\"
New-Item .\EpicFolder\Powershell -ItemType Directory -Force
New-Item .\EpicFolder\Powershell\TestPowershellDocument.doc -ItemType File

$wshshell = New-Object -ComObject WScript.Shell
$desktop = [System.Environment]::GetFolderPath('Desktop')
$lnk = $wshshell.CreateShortcut($desktop+"\ShortcutName.lnk")
$lnk.TargetPath ="c:\EpicFolder"
   $lnk.Save()


Write-Host "Folders and Shortcut created!"
Just play with the thought that you already know that you are going to work with different things, such as Powershell/Word/GroupPolicy/Plugins and so on.
With this script you will save time for everyone, since you don’t have to create the folders and documents again and again – All you need, is to run the script on the computer you use and everyone will have the same folders as you.
Maybe your colleague or friend works with the exact same thing, then this might become useful.
I wouldn’t expect people to do this with just 2 folders and 1 shortcut, but imagine if you had to create 20 folders within 5 folders and then you need to create something more.
Instead of clicking and create everything by yourself, run this script and it will do it for you!
Hope this helped a little,
- Alex
↧
Automate Signature And Status Reports With PowerShell – Windows Defender (.txt file)
What you will be able to after reading this blog:
- Get the latest information about "your" Signature- & Anti Virus reports in Windows Defender and make it into a text file.
- How to automate it, so it will run every day and give you a status report with time and date.
- Being able to look at what time and date the latest updates have been completed.
First of all, we have to create a folder/directory where the status reports can be stored in.
Open up PowerShell in administrative mode and run this script only by copy-paste:
$path="C:\"
   New-Item .\AVStatusReports -ItemType Directory -Force
Now that the folder has been created in your c:\ , we can proceed to the next step.
What we want is a report of the versions of the current Anti-Virus States.
So we are selecting *updated and *version to get into our text file that we want every day – Here’s what it looks like:
Get-MpComputerStatus | select *updated,*version | Out-File C:\AVStatusReports\StatusReport.txt
I bet you get the idea by now, so why don’t we just add the time. Make it into the file and make it run every day so we have a complete status.
By using this script you will always be able to see what’s updated and which version you are currently running.

So let’s watch the full script and get into details:
Get-MpComputerStatus | select *updated,*version | Out-File C:\AVStatusReports\StatusReport.txt

[string]$filePath = "C:\AVStatusReports\StatusReport.txt"
$item = get-item $filePath
[string]$newFileName = $item.BaseName + (Get-date).ToString("ddMMyyyy-HHmmss") + $item.Extension
$newFilePath = Join-Path  $item.DirectoryName $newFileName

Move-Item -LiteralPath $filepath -Destination $newFilePath;
Now we have added a file path to the folder we created earlier.
We are binding the filepath to the directory name which is AVStatusReports and makes the status reports get stored in the folder.
With this script we are adding Date, Month and Year and also the time of every report in the text name.
Now this is just the script you can run if you want a one-time status report.
But if you want to automate this, and make it run every day like me – you can do it through "Task Scheduler".
Here is what you have to do:
- Go to windows and search for: Task Scheduler
- When it’s open, click on "Create Task" and a new box should be open.
- Write the name of your task, but for now call it Anti-Virus Status Report
- Write any description and click on "Change User or Group…" and select the users and groups you want to be affected by this script.
- Select (*) Run whether user is logged on or not
- Configure for: *Change it to what fits your clients*
- Click on "Triggers" and then on "New". Select *On a schedule* and then below click on Daily/Weekly/Monthly.
- Go to advanced settings and select Stop task if it runs longer than: 30 minutes (Depends on what you are doing)
- Last but not least, select Enabled if it’s not already picked and click "OK".
- Click on Actions and click New and write in the name of the program you are using – example: PowerShell.
- On Add arguments write the name of your saved script: .\AVStatusReports.ps1
- On Start in write the location for where you saved the script – example: C:\Scripts\Tutorial
- And click "OK"
When you continue, you are now able to select your own options and what fits your schedules best.
When you are done, click OK and now you have created an automated script which runs every day/week/month

Now you will be able to see the updates and the versions just by going to the folder and click on the date you want to see

I hoped this quick tour was helpful. If you have any questions do not hesitate to comment below!
Have a nice day,
Alexander Gundelack Jensen
↧
Upgrade System Center Configuration Manager Console with PowerShell
Since Service Pack 1 was released to SCCM 2012 R2 I have been upgraded severeal environments. A couple of customers wanted me to create a PowerShell script to uninstall existing ConfigMgr Console and install the new updated version with the latest cumulative updates and hotofixes.
If you create a package to distribute it with SCCM make sure you point the Datasource to the location of the Client installations files, Script, KB3084586-msp and kb3074857-msp.
Installation command for the program will then be: powershell.exe -file “script.ps1″.
Remember to set PowerShell execution policy to “Bypass” under Client Settings. This will not affect policys on the Windows environments, only scripts run from ConfigMgr will work).

If you have any questions, please live a comment below!
Script:
<#
.NOTES
===========================================================================
Created on: 28.08.2015 09.31
Created by: Marius A. Skovli
Organization: Coretech
Filename: Upgrade System Center Configuration Manager Console
===========================================================================
.DESCRIPTION
A description of the file.
#>
# Get cript folder
function Get-ScriptDirectory
{
$Invocation = (Get-Variable MyInvocation -Scope 1).Value
Split-Path $Invocation.MyCommand.Path
}
$ScriptFolder = Get-ScriptDirectory
# Uninstall old System Center Configuration Manager Console
Get-WmiObject -Class Win32_Product | Where-Object { $_.Name -like “System Center 2012 * Configuration Manager Console” } | ForEach-Object -Process { $_.Uninstall() }
# Install System Center Configuration Manager Console
$ConsoleInstallArguments = { TargetDir=“C:\Program Files (x86)\Microsoft Configuration Manager\AdminConsole” DEFAULTSITESERVERNAME=ABG-GUAP43-OSL.abgsec.net ENABLESQM=0 /q }
(Start-Process -FilePath $ScriptFolder\ConsoleSetup.exe $ConsoleInstallArguments -Wait -Passthru).ExitCode
# Install System Center R2 SP1 Configuration Manager CU1
$CU1InstallArguments = “/p $ScriptFolder\configmgr2012adminui-sp2r2sp1-kb3074857-i386.msp /q REBOOT=ReallySuppress REINSTALL=ALL REINSTALLMODE=mous”
(Start-Process -FilePath “msiexec.exe” $CU1InstallArguments -Wait -Passthru).ExitCode
# Install System Center R2 SP1 Configuration Manager CU1 KB3084586
$KB3084586InstallArguments = “/p $ScriptFolder\configmgr2012adminui-sp2r2sp1-kb3084586-i386.msp /q REBOOT=ReallySuppress REINSTALL=ALL REINSTALLMODE=mous”
(Start-Process -FilePath “msiexec.exe” $KB3084586InstallArguments -Wait -Passthru).ExitCode
IF ($LastExitCode -ne 0)
{
Write-Host Cool!
}
↧
IT Devconnections Enterprise Mobility and Identity BOF
During the BOF last week @ #ITDevCon i briefly talked about creating a couple of managed apps using PowerShell in ConfigMgr. Below are a few examples, open PowerShell ISE aas administrator and magic happens
#Import Module
Import-Module $env:SMS_ADMIN_UI_PATH.Replace("\bin\i386","\bin\configurationmanager.psd1")
$SiteCode = Get-PSDrive -PSProvider CMSITE
Set-Location "$($SiteCode.Name):\"
#Create the Word Application
New-CMApplication -Name "Word"
#To create a iOS deployment type for the application
Add-CMDeploymentType -ApplicationName "Word" -AutoIdentifyFromInstallationFile -IosDeepLinkInstaller -DeploymentTypeName "Word iOS" -InstallationFileLocation "https://itunes.apple.com/us/app/microsoft-word/id586447913?mt=8" -ForceForUnknownPublisher $True
#Create the OneNote Application
New-CMApplication -Name "OneNote"
#To create a iOS deployment type for the application
Add-CMDeploymentType -ApplicationName "OneNote" -AutoIdentifyFromInstallationFile -IosDeepLinkInstaller -DeploymentTypeName "OneNote iPhone" -InstallationFileLocation "https://itunes.apple.com/us/app/microsoft-onenote-for-iphone/id410395246?mt=8" -ForceForUnknownPublisher $True
Add-CMDeploymentType -ApplicationName "OneNote" -AutoIdentifyFromInstallationFile -IosDeepLinkInstaller -DeploymentTypeName "OneNote iPad" -InstallationFileLocation "https://itunes.apple.com/us/app/microsoft-onenote-for-ipad/id478105721?mt=8" -ForceForUnknownPublisher $True
#Create the OneDrive Application
New-CMApplication -Name "OneDrive"
Add-CMDeploymentType -ApplicationName "OneDrive" -AutoIdentifyFromInstallationFile -AndroidDeepLinkInstaller -DeploymentTypeName "OneDrive Google" -InstallationFileLocation "https://play.google.com/store/apps/details?id=com.microsoft.skydrive" -ForceForUnknownPublisher $True
Add-CMDeploymentType -ApplicationName "OneDrive" -AutoIdentifyFromInstallationFile -IosDeepLinkInstaller -DeploymentTypeName "OneDrive iOS" -InstallationFileLocation "https://itunes.apple.com/us/app/onedrive/id477537958?mt=8" -ForceForUnknownPublisher $True
#Create the Office Application
New-CMApplication -Name "Office Google"
# To create a Goggle Play deployment type for the application
Add-CMDeploymentType -ApplicationName "Office Google" -AutoIdentifyFromInstallationFile -AndroidDeepLinkInstaller -DeploymentTypeName "Office" -InstallationFileLocation "https://play.google.com/store/apps/details?id=com.microsoft.office.officehub" -ForceForUnknownPublisher $True
#Create the Browser Application
New-CMApplication -Name "Intune Browser"
Add-CMDeploymentType -ApplicationName "Intune Browser" -AutoIdentifyFromInstallationFile -IosDeepLinkInstaller -DeploymentTypeName "Intune Browser iOS" -InstallationFileLocation "https://itunes.apple.com/us/app/microsoft-intune-managed-browser/id943264951?mt=8" -ForceForUnknownPublisher $True
Add-CMDeploymentType -ApplicationName "Intune Browser" -AutoIdentifyFromInstallationFile -AndroidDeepLinkInstaller -DeploymentTypeName "Intune Browser Google" -InstallationFileLocation "https://play.google.com/store/apps/details?id=com.microsoft.intune.mam.managedbrowser&hl=en" -ForceForUnknownPublisher $True
↧
↧
Deploying Office 2016 with SCCM 2012

Follow this simple guide to get your Office 2016 deployment up and running with SCCM 2012 R2
First we need to download the Office 2016 Deployment Tool from Microsoft
You can find it here
Run the tool and install it to a location of your liking, I choose e:\temp\Office 2016
When you look in that folder you’ll find a setup.exe and a sample configuration file.
Download the content
In order to download the Office 2016 installation files, we first need to create a download file
So fire up your favorite text editor and enter the following
<Configuration><Add SourcePath="e:\temp\office2016\x64 EN" OfficeClientEdition="64" ><Product ID="ProPlusRetail"><Language ID="en-us" /></Product></Add></Configuration>
Save it with the name “download x64 en.xml”
Now start a command prompt and navigate to the folder where you installed the Office 2016 Deployment Tool
Now run this command: setup /download “download x64 en.xml”

When the program is complete you’ll have a new folder called x64 EN in your folder
Now copy the file “download x64 en.xml” and rename the new file to “download x86 en.xml”
Open the new file and change the content to match the following
<Configuration><Add SourcePath="e:\temp\office2016\x86 EN" OfficeClientEdition="32" ><Product ID="ProPlusRetail"><Language ID="en-us" /></Product></Add></Configuration>
Save the file and run this command: setup /download “download x86 en.xml”
When program is complete you’ll have additional folder called x86 EN
If you, like me, use a language that is not English, you can download localized versions of Office 2016 like follows
Download the localized version
Like before copy your “download x64 en.xml” and rename the new file to “download x64 da.xml”
Open the file and change the content to match the following
<Configuration><Add SourcePath="e:\temp\office2016\x86 DA" OfficeClientEdition="64" ><Product ID="ProPlusRetail"><Language ID="da-dk" /></Product></Add></Configuration>
Save the file and run this command: setup /download “download x64 da.xml”
When program is complete you’ll have additional folder called x64 DA
Configuration files for Office 2016
Copy the “setup.exe” to the folder where you downloaded the Office files, a copy for each folder.
So now your folder looks something like this

In order to have SCCM do a silent and unattended installation of Office 2016 we need to create a configuration for setup.exe
Again fire up your favorite text editor and create a file like this
<Configuration><Add OfficeClientEdition="64"><Product ID="ProPlusRetail" PIDKEY="XXXXX-XXXXX-XXXXX-XXXXX-XXXXX"><Language ID="en-us" /></Product></Add><Display Level="None" AcceptEULA="TRUE" /></Configuration>
You can leave out the PIDKEY value and use alternate methods of activation, but I assure you XXXXX-XXXXX-XXXXX-XXXXX-XXXXX will not work J
For the other folders make sure that you change the values marked in bold
Now your folder looks like this

This is exactly the content needed to install this particular version of Office 2016, so it is perfect to be deployed as a deployment type for an application in SCCM 2012.
Installation using SCCM 2012
Okay let’s get down to some deployment business … fire up your SCCM 2012 Console
Start the Create Application Wizard
Select “Manually Specify the application information”

Enter the name, I used “Microsoft Office 2016″

Just click next …

Click Add… to create a deployment type

Select “Manually specify the deployment type information”

Enter a name for the deployment type, I like “Silent Install x64″, sounds a bit like ninjas and stuff

Specify the location of your source files
Enter the following as Installation program: setup.exe /configure “configuration x64.xml”

Click Add Clause to add a detection rule

Select Windows Installer and use {90160000-008C-0000-1000-0000000FF1CE} for the product code
Technically it is the product for the “Office 16 Click-to-Run Extensibility Component” but it does the trick.

All done for the detection method

Set whatever user experience you like, again I like stealthy ninja deployments.

We also should add a requirement for x64 OS, just in case.

Select the x64 operating systems you support.

All done here

And here

Let’s summarize a little

Almost done …

But not yet …

Okay if this was a Youtube video I would do some fast forward magic to save your time…

Now all that remains is to distribute and deploy …
↧
Troubleshooter note: SQL Installation fails with exitcode 0x84BB0001 on a ReFS formatted partition.
So I tried to install SQL the other day for a new ConfigMgr environment, but I kept getting an error during the first seconds of the installation with 0x84BB0001 as the exit code. With some quick investigation into the log files I found this
%Temp%\SqlSetup_Local.log:

C:\Program Files\Microsoft SQL Server\110\Setup Bootstrap\Log\Summary.txt:
Shows that the installation has difficulties installing on a ReFS formatted partition

Disk Manager Shows that D:\ is formatted with ReFS (I blame my PowerShell Script ![]() ):
):

Now the quick and easy way of fixing this is to reformat the partition to NTFS. And this is what I did in this case. But Microsoft has introduced support for ReFS for various versions of SQL in Cumulative Updates but not for SQL 2012. “There are some features of NTFS that aren’t supported by ReFS, specifically named streams, object IDs, short names, compression, file-level encryption (EFS), user data transactions, sparse, hard-links, extended attributes, and quotas. SQL Server databases uses named streams and sparse files in several functions, for example DBCC CHECKDB. This means you should not use ReFS with SQL Server. Stick with NTFS. Ref; http://windowsitpro.com/sql-server-2012/using-refs-sql-server
FIX: “Requested value ReFS was not found” error when you install SQL Server 2014 on a local drive that is ReFS formatted: https://support.microsoft.com/en-us/kb/3017266
Changing it back to NTFS fixed to issue for me. ![]() Happy troubleshooting!
Happy troubleshooting!

↧
Windows Defender not getting definition updates on a Windows 10 client managed by ConfigMgr
With the announcement of Windows 10 Microsoft said that ConfigMgr 2012 would natively support Windows Defender in the latest Service pack (http://blogs.technet.com/b/configmgrteam/archive/2015/05/14/announcing-the-availability-of-sysctr-2012-r2-configmgr-sp1-and-sysctr-2012-configmgr-sp2.aspx). That means, for those of you who are using Endpoint Protection as the Antivirus solutions on clients and servers, needs to start using the Windows Defender instead and stop deploying SCEP (to Windows 10). Now, this is great because old policies work great, however definition updates for Endpoint Protection do not so we have to make a little adjustment to our routines. First confirmation on the policies:
SCEP with Policy from SCCM:

Windows defender with policy from SCCM:


Solution for updates: So Windows Defender gets its definition updates within the same Software Updated routines as SCEP we just need to add Windows Defender to the Products we want to Sync updates for.

Remember to also change any other rules like ADR to also contain Windows Defender as a product:

Cheers. J
↧
Add the “Trigger Setup Rollback” Step in Windows vNext (Windows 10) Upgrade Task Sequence for proper status monitoring
With the announcement of Windows 10 Microsoft released a pre-created Task Sequence for an in-place-upgrade scenario with all the necessary steps it takes to upgrade from Windows 7, 8 or 8.1. For more information and the task sequence itself go to the System Center Team blog here: http://blogs.technet.com/b/configmgrteam/archive/2015/06/16/revised-content-for-the-win10-in-place-upgrade-via-task-sequence-for-configmgr.aspx
The task sequence after imported into SCCM:

Now, the task sequence comes 100 % out-of-the-box, but if you want to monitor Roll Back Scenarios then you have to add a simple step at the end of the sequence named Trigger Rollback.
To do this simply create create the step under the Rollback group

Now, if you take a look at the “Windows vNext Upgrade Scripts” folder it also contains SetupRollback.cmd. But taking a look at the script reveals that it simply calls the PowerShell script and sets Execution Policy to Bypass. The same we are doing in the Task Sequence.
“The Trigger Rollback Failure step should be the last one in that group to purposefully fail the task sequence for proper status monitoring.”
Go deploy Windows 10!
Cheers! ![]()
↧
↧
How to: Create custom SQL- based Reports in System Center 2012 R2: Configuration ManagerHow to create custom SQL- based Reports in System Center 2012 R2: Configuration Manager
A customer asked me for a “how-to” on how to Create reports in SCCM 2012, so why not share with everyone. This post is not intended to show how to write or design queries, but show you have to create a report based on a SQL query you might already have. Even-though we are skipping how to write SQL Queries for know, this post is still going to be a bit long. Time for that cup of coffee!
First some requirements:
- You need to have an SQL Server instance for SCCM with SQL Reporting Services running
- You need to have the SCCM Reporting Services Point role installed and configured which provided integration with SQL Server Reporting Services
- The Reporting Services Point Account need to have read-rights to the Reporting database on the SCCM SQL Instance.
- To see all requirements go to Microsoft TechNet: http://technet.microsoft.com/en-us/library/gg712698.aspx
- To see how to add the role go to Windows Noob: http://www.windows-noob.com/forums/index.php?/topic/4550-using-sccm-2012-rc-in-a-lab-part-11-adding-the-reporting-services-point-role
When all of the above is configured properly you should end up with a bunch of reports under Monitoring – Reporting – Reports.
Lets get started!
Open up your SCCM 2012 Console and navigate to monitoring. Then go to reports, right click and then click “Create Report”.

Now make sure you select “SQL-based Report”. Give it a proper name and browse to a folder you want to save it.
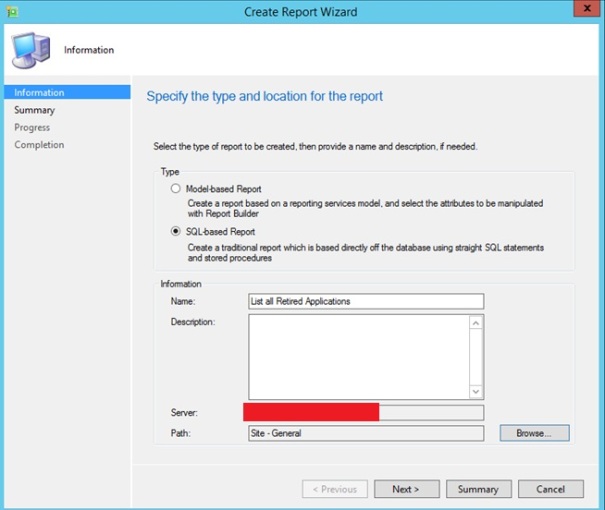
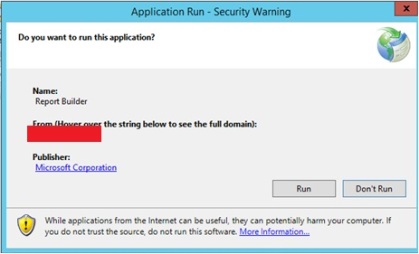
Now just click next, next, close. After you close a IE-window will automatically open. If you need to authenticate do so and add the URL to trusted-sites. The next thing that will happen is SQL Reporting Builder will either be installed or it will start depending on if it has been installed earlier or not.

When you enter the SQL Server Reporting Builder you get a Office “Look and Feel” GUI. Here we can customize all the reports that already exists in SCCM and alle the new ones we are about to create! ![]()
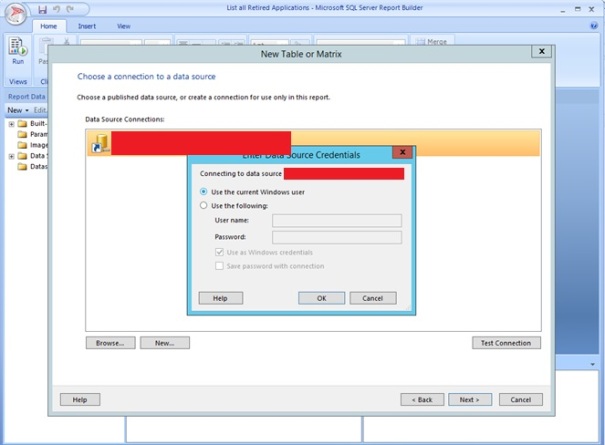
The first thing we need to do is the create a New Table, so click on “New table or Matrix”. You should get a view similar to the one below. Next make sure that “create dataset” is checked on and click next.

On the next screen choose Data Source Connection. There may be that you will have to authenticate. Choose either to authenticate with current Windows User or type another username and password.
Click on “Edit as Text” and paste your SQL Query. Hit execute (!) to test if your query works and presents the data your are looking for. Click Next.

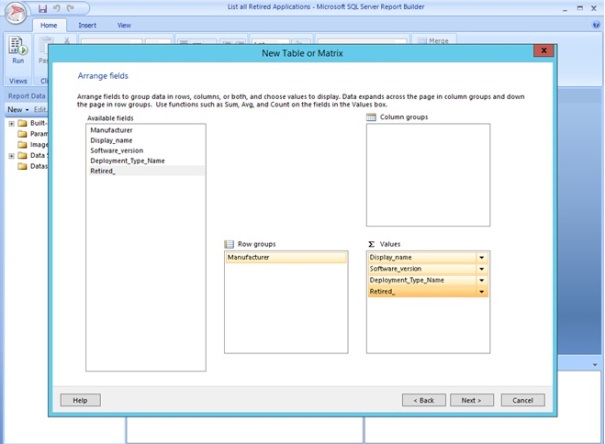
Arrange the different fields as you like and then click next. Also, time to honor yourself with a new cup of coffee!
Example query if you do not have one:
SELECT
vWorkstationStatus.Name AS 'Computer name',
vWorkstationStatus.UserName AS 'User name',
v_GS_COMPUTER_SYSTEM.Manufacturer0 AS 'Manufacturer',
v_GS_COMPUTER_SYSTEM.Model0 AS 'Model',
v_GS_PC_BIOS.SerialNumber0 AS 'Serialnumber', CONVERT(varchar(20),
v_GS_OPERATING_SYSTEM.LastBootUpTime0, 100) AS 'Last Boot',
v_GS_OPERATING_SYSTEM.Caption0,
v_GS_OPERATING_SYSTEM.InstallDate0 AS 'Installation date'
FROM
vWorkstationStatus INNER JOIN
v_GS_PC_BIOS ON vWorkstationStatus.ResourceID = v_GS_PC_BIOS.ResourceID INNER JOIN
v_GS_OPERATING_SYSTEM ON vWorkstationStatus.ResourceID = v_GS_OPERATING_SYSTEM.ResourceID INNER JOIN
v_GS_COMPUTER_SYSTEM ON v_GS_PC_BIOS.ResourceID = v_GS_COMPUTER_SYSTEM.ResourceID
WHERE
(vWorkstationStatus.OperatingSystem not like N'%server %')
Order by 'Computer name', Caption0 ASC;
This is optional, but I like to remove subtotals and grand totals. Click next.

Choose a style. I often go fore the generic once as I like to customize the reports by myself. Click Finish.

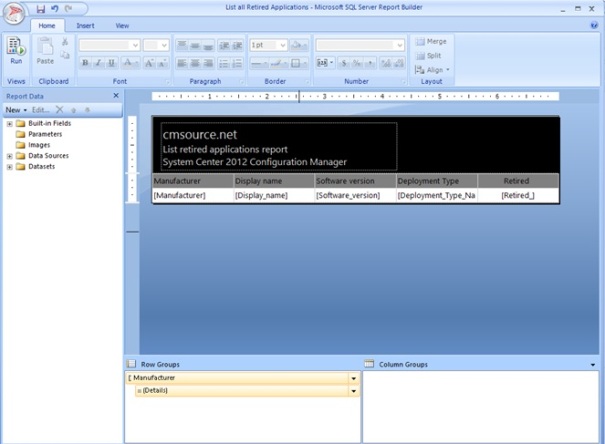
Finally customize your report as you wish. The reporting builder is not so smooth as Word or any other Office product, but after playing with the product you should be able to create some good looking reports! After your are finished, remember to save your report. Underneath is an example of how you can do it if you are in a hurry! ![]()
In the Reporting Builder:
From SCCM 2012:

Happy reporting! ![]()
↧
Troubleshooting: An error occurred when creating the WSUS Signing Certificate (Secunia)
Lately I have been doing some Secunia integrations with System Center 2012 R2: Configuration Manager (SCCM/ConfigMgr 2012). When you are setting up the connector between Secunia CSI and WSUS one of the first things the wizard is asking you to do is to Configure a WSUS Self-Signed Certificate, the WSUS signing certificate is required to create and install local packages. Without it, only packages from Microsoft Update will be installed.
How-ever this time I got this error when trying to ‘Automatically create and install certificate’ during the Connector Wizard: An error occurred when creating the WSUS Signing Certificate

Now this error would probably not appear on Windows Server 2012 or earlier editions and the reason why is that Microsoft has disabled the feature in Windows Server 2012 R2 (the platform I am using). This is because and I quote (The WSUS Product Team) “We disabled this feature because it was causing a significant management burden for those using the feature, and it duplicated functionality that already exists in Windows Server Certificate Services (and other products)”.
The good thing is that it has an easy quick fix or workaround. Get your PowerShell prompt with administrative rights up and running and execute the following command:
New-ItemProperty -Path "HKLM:\Software\Microsoft\Update Services\Server\Setup"-PropertyType DWORD -Name EnableSelfSignedCertificates -Value 1-Force

The result: Success!!


Again, happy troubleshooting! 
/Marius
↧
Techdays Sweden 2015, notes and links
Thanks to all attending the preconference on Managing Windows 10 with Microsoft EMS, MDT and Configuration Manager. To all of those who attending the “What’s new and coming in Configuration Manager vNext”.
- Sessions from Techdays will be online on Channel 9 https://channel9.msdn.com/Events/TechDays-Sweden/TechDays-Sweden-2015
- Configuration Manager vNext information https://technet.microsoft.com/library/dn965439.aspx#BKMK_Win10Servicing
- Windows 10 Servicing must read https://technet.microsoft.com/en-us/library/mt598226(v=vs.85).aspx
- Windows 10 Servicing must read https://technet.microsoft.com/en-us/library/mt574263(v=vs.85).aspx and NO, it’s not the same doc
- SQL Audit – https://stevethompsonmvp.wordpress.com/2014/05/19/powershell-sql-audit-script/
- WSUS optimization – http://blog.coretech.dk/kea/house-of-cardsthe-configmgr-software-update-point-and-wsus/
- Windows 10 Defender OMA-URI downloads – http://blog.coretech.dk/kea/managing-windows-10-using-on-premises-mdm-in-system-center-configuration-manager-vnext/
- Install and configure onprem-mdm in Configuration Manager vNext – http://blog.coretech.dk/kea/install-and-configure-on-prem-mobile-device-management-mdm-with-configmgr-vnext-tp3/

↧